
Journals48
Newest
Still alive edition 152
1 min read
Yes, I'm still here. ") Just in case anyone is interested.
Just in case anyone is interested.
A milloin things to do during last year, like writing a book about pet parrot behavior (in Finnish) and finishing my website (second version within one year): www.papukaija.fi (this one is in Finnish too).
I'll have a chance to do some nature photography next weekend or so. So I might have something worth uploading next week.
Join the community to add your comment. Already a deviant? Log In
Still alive 2
6 min read


Join the community to add your comment. Already a deviant? Log In


Join the community to add your comment. Already a deviant? Log In
Guide to more advanced sunset photography
20 min read
This article is continuing where I left in my last part. If you have a feeling you're a beginner with sunset photography, I would suggest reading that part first. It covers mostly some basic stuff, while this article drills a bit deeper in few aspects of sunset photography. I expect that you are somewhat familiar with the concept of exposure or using ND grads, for example.
news.deviantart.com/article/42… A guide to better sunset photos
For experienced photographers, these things might be self evident. But what I can see quite often in dA is that there are people who would benefit from this information. The "advanced" part is there only since it's more advanced than last part. Remember, again, that these are not absolute truths, just my own opinions. If you disagree, just write a comment about your opinion.
I also want to share with you one of my favorite photographers, Marc Adamus: photo.net/photodb/user?user_id… His landscape photos are definitely worth of seeing.
Weather
Personally I'm always looking to sky during the day if I would have time to go to shoot something in the evening. The best weather naturally depends on what you want and after getting some experience, you might know what kind of weather you actually prefer.
A clear sky might not always be the most interesting option. In my opinion, best possible weather would be having some thin clouds over the sky. This way, when the sun is setting, it actually colors the whole sky. The effect can be amazing and still unfortunately I've seen the best sunsets only from my balcony.
Also, in the long run, just a clear sky can be rather boring. If you are shooting during a clear sky, I would composing the image so that the sky plays a minor role in the image. So for this, you really need to have a good foreground interest. On the other hand, with amazing sky, you might be able to pull it off without too much other stuff in the frame (though naturally for the best image, you really want amazing sky and something really interesting in the foreground).
If you have checked the link I gave you in the beginning, you might notice that most of the images there (taken during sunset) have clouds in the sky. It's just one of those things that give the final touch for the image. The slightly cloudy sky can be tricky though, so you'll need to be ready for disappointments. Sometimes the clouds in the horizon can block the sun getting into clouds above you.
When shooting around water, the wind is also one good aspect to consider. On a still day, you might have amazing reflections of the sky on the water. On the other hand, on windy day the waves would create interesting effect. With long exposures (several seconds) and strong waves you could get a foggy-like surface for the water. Or you might use somewhat semi-long exposures (something around 1/2s) to keep some form in the water but still make it look like it's flowing. If it's still, you might want to look around if any boats would be creating large waves that would hit the coast.


Left: The sun has painted the clouds in the sky. This way the clouds and reflection alone are enough to make interesting photo. Though notice that the clouds are somewhat thick so they're not completely painted. The somewhat still water enabled to use the reflection in this image.
Middle: Just the plain sky alone is usually quite boring for sunsets, like this one. This really required something into foreground. But it still would require some clouds in the sky.
Right: The 1s exposure didn't create completely smooth water. You can see the effect of one large wave clearly.
Timing</p>
Right timing is really important with sunset photography. You might need just the right moment that might not last longer than few minutes. I covered some aspects of timing in my last article but here I'll just give you few more thoughts about this matter.
First of all, like I've stated before, you really need to know the time when the sun is setting so you can be in place early enough. The official time for sunset really is quite accurate but it doesn't take into account that the horizon might be slightly higher for you. For example, you might have tall trees close to you, or a hill. So in these cases, the sun actually goes below horizon slightly earlier. But this isn't rocket science, you don't need to be there with a stop watch to wait for the right moment. Be there early enough and wait until it looks good.
You shouldn't pack your gear and head home when the sun has set below the horizon. If there are clouds in the sky, I've found that the best timing would be around half an hour after the sunset. Since the clouds are so high, they'll still get light from the sun even though you can't see it. Usually this is the moment when the sky might be red. The best timing might wary from area to another but still it can be later than you might think. Be patient.
If you want gradually colored clear sky, you might get it just after the sun has set below horizon. This way you can get a gradual change from red/orange/yellow to blue. Also one advance of letting the sun drop below horizon is that you won't get so badly burned out areas around the sun. If you're trying to counter this only with regular ND grads, you would end up with really dark sky just a bit farther away from the sun.
Another thing with sunsets is the opposite direction from the sun. Even before the sun has set below the horizon, it starts to get darker there. You might get interesting results since it usually is either blue or purple.


Left: In this case, the sun had already set some time before taking this photo. It also provided a change to use long exposure without ND filter.
Right: I had to stack ND grad filters to prevent blowing out the sky completely around the sun. This led into really dark sky farther away from the sun.
Composition
Just few more thoughts about the composition... again, for some people this might be quite self evident stuff, but I would imagine this might be helpful for some. This really applies to all landscape photography too.
First important thing with composition is to learn to think in a way that you'll place the objects into frame. Not only with sunset photography, but also with everything you're photographing. You don't just take the photo of what you happen to see, but carefully think and place all the object to right places in the frame. Naturally you can't move them with sunset photos (well, a tree might be doable with a saw... and a rock with TNT but I don't think sun would be too easy) and it limits this a bit, but you still can move around yourself and change the relative positions of different objects.
So lets have a really simple example. You have a rock quite close to you and the sun in the background. Lets start the way that you're standing so that the rock and sun are on the same line. Probably would be relatively boring composition. Now you'll take two steps to right and aim your camera between the sun and rock. Rock has moved to left and sun right in the frame. This is what I mean with "placing objects" in the frame.
Next you'll get on your knees. The rock might become slightly larger in the frame, but what is important is that the horizon is lower in the frame if you'll keep the rock in the same place. So before taking the image, try to move around trying different compositions. Try how the objects behave in relation to each other.
How should you place the objects then? Well, there's really no rules for this. There are few things you might want to keep in mind though. First of all, you could try to think about the relative weight of the object in the frame. Sun naturally is quite heavy object in the frame. What about different objects? Is there something that automatically draws the attention even better than then sun? And how do these single objects interact with other elements in the image, like horizon or different lines, for example.
One example of this could be (again, really simple one) that you have one object that draws attention of the viewer. It's sitting next to road, so you'll use the road as leading line that leads into horizon and to sun. This way you'll lead the viewer from the object to the sun, through the image.
Think what kind of mood you would like to create and what the setting looks like in general. Do you want a balanced composition? Then you might want to use the 1/3 rule: placing the sun on the other side and some other heavy object on the other. And you might want to place the horizon on lower or higher horizontal 1/3 line (depending on whether you want to emphasize the sky or foreground in the scene). Or perhaps the settings is something where you would like to create a symmetrical image? Then just place the sun in the middle of the frame. Placing all the heavy objects on the other side of the frame creates unbalanced image that might go well with some other scenes.
Also one aspect of creating the image is selecting what to include in the image and what not. When cropping something away, you can do this with to ways: either you can zoom the lens (if you're using a zoom lens) or you can move yourself. These are actually not complete substitutes of each other, but create different effect. Zooming is similar to just cropping the image, so it's quite straight forward. But when you're moving yourself, you'll actually change the perspective. You could try both ways in different scenes to familiarize yourself with the difference.
This might sound quite complicated in the beginning, but most of the times I don't have to think about "where I would like to place that object". With practise, it comes automatically and you don't need certain rules to do it. But it's good to have something where you can base your decision in the beginning.
Foreground interest
Here I'll have few quite basic examples of possible foreground interests and my thoughts about them. As you might notice, I personally like to include them into sunset photos quite often. It creates more depth into scene. Also one benefit with it is that you can isolate all the rest of the surroundings, so this enables you to create interesting photos from places where there's too much clutter around. I'm quite rarely photographing in complete wilderness and there might be some buildings etc around me so this way I can create interesting photos in places where I can travel quickly.
Simplest option would be a single, relatively simple object. It might be a rock, stump etc. This is usually quite easy to deal with. Just move a bit and place the object in relation with other stuff in the frame. In the long run, just having a single rock in every image might get rather boring though. Try to look for flowers or something colorful that would create some more variety in the colors you have int he frame. Old boats etc are also one nice option.


Left: A schoolbook example of placing the sun and object in the frame using 1/3 spots. This was also photographed in quite close to center of my old hometown. There's lots of buildings behind me, as well as a road few meters back. But this let me create a nice image by isolating everything else away.
Right: This old boat really creates the image. It would be quite boring without it. Since I wanted to shoot this as vertical photo, it made most sense to place the boat in the middle of the frame, since it takes so large part of the frame.
A bit more complicated thing would be some kind of formation of objects, like several stones. Here you might want to move around them as much as possible. You also need to decide which ones to include into frame and which ones not. Try to see if the formation is heavier on the other side, for example, when placing the sun in relation to it. Also you might want to see if the formation would create anything interesting, like leading lines to use.

This formation of rocks creates interesting "arrow" pointing into horizon, leading your gaze through the image. I also decided to leave few of them outside the frame that didn't fit the image too well. As stated, you can do this either by moving yourself or zooming. Moving changes the perspective while zooming only crops.
A pool of water is usually really nice object with sunset. It might create really nice reflection of the sky. Easiest place to find these would probably be near a lake or sea. One important thing to consider with these is the shape of the pool again, somewhat same as with a formation of several objects. You could also place the pool in the middle of the frame, especially if it fills the lower partition of it in vertical image.

Left: Combination of the pools shape and the leaves on the right side made me to place the pool itself on the left side of the frame.
Right: Since the pool didn't take the whole bottom of the frame, and I had the pier on the left side, I decided to place the pool on the right side of the frame. Notice that I have cropped this in post processing. It's better to get the composition right in the field but you can easily crop the image in post-processing also.
A coast is also really interesting foreground interest, especially if there's enough waves. You need to find some spot that looks nice in image. Then decide what kind of exposure time to use. I talked about this in the "weather" part of this article. You might use a beach here to photograph a wave coming to the beach or you might want to photograph a wave hitting the rocky coastal line.
It's important to keep your eyes open for anything interesting you might see. These are just few examples and most likely you could create the most interesting photos with the help of something really different. But it's at least good to practice with some basic things.
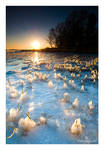
This is the most popular photo in my gallery. Just something I happened to walk past. Light shining through the ice formations really looked interesting. Also notice that I still placed the sun on the left 1/3 spot since the trees were on the right side.
My basic work flow
As the last part I'm going to go through my basic work flow. I'm not talking only about post-processing here, but the work flow from planning the shoot to finished image (in this case ready to be uploaded here). The reason I chose this image was that it is one of my more recent images and I still remember what I did for it. This work flow might not be best for you (or you even might know how I could do it better) but this is just one example.
The whole process starts with planning phase. First I need an interesting place to visit. Since this is sunset photography, it needs to have a nice view into sunset, so I started with finding out the sunset direction. I used Google maps to look for interesting place. When I found one, I also checked few sites with aerial photos that what it actually looks like. When I was satisfied, I made an schedule for me. I also knew that the weather forecast for the day was saying that the sun might be visible. It was not for sure, but I decided to try it anyway.
As next step, I found out when the sun was setting and planned my trip according to that. I arrived to location about few hours before the sunset. I walked around for some time, looking for good spots to take the photo and this was among them. This was relatively tricky spot since the seaweed was quite slippery. I had to be extra careful there not to slip and fall into water with my camera. On the other hand, the seaweed gave interesting green color for the image and I wanted to have it in the frame.
When the time was right, I came back there. First I had my camera on my hand and looked through the viewfinder for good angle. Then I set up the tripod and attached the ND grad filters and remote trigger for to the camera. I measured the light, put on the filter and took one test photo to check the exposure from histogram. I also adjusted the timing a bit (1s exposure, not to make foggy water but still make it look like it's flowing).
I used mirror lock up and remove trigger to shoot this. This prevents all the vibrations that would come from either me touching the camera or the mirror slamming open affecting the image. I locked the mirror up and waited for a good wave and then shot the image.
When I got back home, I uploaded the images to my computer with Adobe Lightroom that I use as catalog. I made the raw conversion and few basic changes with it (like curves, white balance and color vibrancy) and then exported 16bit tiff to Photoshop. With Photoshop, I tweaked the levels and also cloned a small part of a stone away from the bottom part of the frame. I re-sized the image, sharpened it, put the watermark and frames to it and uploaded it.
So here are few more thoughts about sunset photography that I have learned during past 6 months. The learning curve is quite steep in the beginning but now it starts to get slightly slower, so it might take a bit more time before I'll get back with this subject. But I'll try to come up with other topics to write about.
My previous articles:
news.deviantart.com/article/57… A quick self-portrait guide
news.deviantart.com/article/55… Beginners wedding photography guide
news.deviantart.com/article/54… 7 Photos as an Example - How did I make them?
news.deviantart.com/article/53… Do-it-Yourself Photography Studio
news.deviantart.com/article/46… How to analyze and critique a photo
news.deviantart.com/article/43… Photography as a Hobby: How to start improving
news.deviantart.com/article/42… Guide to better sunset photos
news.deviantart.com/article/41… Photography learning resources on internet
news.deviantart.com/article/42… A guide to better sunset photos
For experienced photographers, these things might be self evident. But what I can see quite often in dA is that there are people who would benefit from this information. The "advanced" part is there only since it's more advanced than last part. Remember, again, that these are not absolute truths, just my own opinions. If you disagree, just write a comment about your opinion.
I also want to share with you one of my favorite photographers, Marc Adamus: photo.net/photodb/user?user_id… His landscape photos are definitely worth of seeing.
Weather
Personally I'm always looking to sky during the day if I would have time to go to shoot something in the evening. The best weather naturally depends on what you want and after getting some experience, you might know what kind of weather you actually prefer.
A clear sky might not always be the most interesting option. In my opinion, best possible weather would be having some thin clouds over the sky. This way, when the sun is setting, it actually colors the whole sky. The effect can be amazing and still unfortunately I've seen the best sunsets only from my balcony.
Also, in the long run, just a clear sky can be rather boring. If you are shooting during a clear sky, I would composing the image so that the sky plays a minor role in the image. So for this, you really need to have a good foreground interest. On the other hand, with amazing sky, you might be able to pull it off without too much other stuff in the frame (though naturally for the best image, you really want amazing sky and something really interesting in the foreground).
If you have checked the link I gave you in the beginning, you might notice that most of the images there (taken during sunset) have clouds in the sky. It's just one of those things that give the final touch for the image. The slightly cloudy sky can be tricky though, so you'll need to be ready for disappointments. Sometimes the clouds in the horizon can block the sun getting into clouds above you.
When shooting around water, the wind is also one good aspect to consider. On a still day, you might have amazing reflections of the sky on the water. On the other hand, on windy day the waves would create interesting effect. With long exposures (several seconds) and strong waves you could get a foggy-like surface for the water. Or you might use somewhat semi-long exposures (something around 1/2s) to keep some form in the water but still make it look like it's flowing. If it's still, you might want to look around if any boats would be creating large waves that would hit the coast.
Left: The sun has painted the clouds in the sky. This way the clouds and reflection alone are enough to make interesting photo. Though notice that the clouds are somewhat thick so they're not completely painted. The somewhat still water enabled to use the reflection in this image.
Middle: Just the plain sky alone is usually quite boring for sunsets, like this one. This really required something into foreground. But it still would require some clouds in the sky.
Right: The 1s exposure didn't create completely smooth water. You can see the effect of one large wave clearly.
Timing</p>
Right timing is really important with sunset photography. You might need just the right moment that might not last longer than few minutes. I covered some aspects of timing in my last article but here I'll just give you few more thoughts about this matter.
First of all, like I've stated before, you really need to know the time when the sun is setting so you can be in place early enough. The official time for sunset really is quite accurate but it doesn't take into account that the horizon might be slightly higher for you. For example, you might have tall trees close to you, or a hill. So in these cases, the sun actually goes below horizon slightly earlier. But this isn't rocket science, you don't need to be there with a stop watch to wait for the right moment. Be there early enough and wait until it looks good.
You shouldn't pack your gear and head home when the sun has set below the horizon. If there are clouds in the sky, I've found that the best timing would be around half an hour after the sunset. Since the clouds are so high, they'll still get light from the sun even though you can't see it. Usually this is the moment when the sky might be red. The best timing might wary from area to another but still it can be later than you might think. Be patient.
If you want gradually colored clear sky, you might get it just after the sun has set below horizon. This way you can get a gradual change from red/orange/yellow to blue. Also one advance of letting the sun drop below horizon is that you won't get so badly burned out areas around the sun. If you're trying to counter this only with regular ND grads, you would end up with really dark sky just a bit farther away from the sun.
Another thing with sunsets is the opposite direction from the sun. Even before the sun has set below the horizon, it starts to get darker there. You might get interesting results since it usually is either blue or purple.
Left: In this case, the sun had already set some time before taking this photo. It also provided a change to use long exposure without ND filter.
Right: I had to stack ND grad filters to prevent blowing out the sky completely around the sun. This led into really dark sky farther away from the sun.
Composition
Just few more thoughts about the composition... again, for some people this might be quite self evident stuff, but I would imagine this might be helpful for some. This really applies to all landscape photography too.
First important thing with composition is to learn to think in a way that you'll place the objects into frame. Not only with sunset photography, but also with everything you're photographing. You don't just take the photo of what you happen to see, but carefully think and place all the object to right places in the frame. Naturally you can't move them with sunset photos (well, a tree might be doable with a saw... and a rock with TNT but I don't think sun would be too easy) and it limits this a bit, but you still can move around yourself and change the relative positions of different objects.
So lets have a really simple example. You have a rock quite close to you and the sun in the background. Lets start the way that you're standing so that the rock and sun are on the same line. Probably would be relatively boring composition. Now you'll take two steps to right and aim your camera between the sun and rock. Rock has moved to left and sun right in the frame. This is what I mean with "placing objects" in the frame.
Next you'll get on your knees. The rock might become slightly larger in the frame, but what is important is that the horizon is lower in the frame if you'll keep the rock in the same place. So before taking the image, try to move around trying different compositions. Try how the objects behave in relation to each other.
How should you place the objects then? Well, there's really no rules for this. There are few things you might want to keep in mind though. First of all, you could try to think about the relative weight of the object in the frame. Sun naturally is quite heavy object in the frame. What about different objects? Is there something that automatically draws the attention even better than then sun? And how do these single objects interact with other elements in the image, like horizon or different lines, for example.
One example of this could be (again, really simple one) that you have one object that draws attention of the viewer. It's sitting next to road, so you'll use the road as leading line that leads into horizon and to sun. This way you'll lead the viewer from the object to the sun, through the image.
Think what kind of mood you would like to create and what the setting looks like in general. Do you want a balanced composition? Then you might want to use the 1/3 rule: placing the sun on the other side and some other heavy object on the other. And you might want to place the horizon on lower or higher horizontal 1/3 line (depending on whether you want to emphasize the sky or foreground in the scene). Or perhaps the settings is something where you would like to create a symmetrical image? Then just place the sun in the middle of the frame. Placing all the heavy objects on the other side of the frame creates unbalanced image that might go well with some other scenes.
Also one aspect of creating the image is selecting what to include in the image and what not. When cropping something away, you can do this with to ways: either you can zoom the lens (if you're using a zoom lens) or you can move yourself. These are actually not complete substitutes of each other, but create different effect. Zooming is similar to just cropping the image, so it's quite straight forward. But when you're moving yourself, you'll actually change the perspective. You could try both ways in different scenes to familiarize yourself with the difference.
This might sound quite complicated in the beginning, but most of the times I don't have to think about "where I would like to place that object". With practise, it comes automatically and you don't need certain rules to do it. But it's good to have something where you can base your decision in the beginning.
Foreground interest
Here I'll have few quite basic examples of possible foreground interests and my thoughts about them. As you might notice, I personally like to include them into sunset photos quite often. It creates more depth into scene. Also one benefit with it is that you can isolate all the rest of the surroundings, so this enables you to create interesting photos from places where there's too much clutter around. I'm quite rarely photographing in complete wilderness and there might be some buildings etc around me so this way I can create interesting photos in places where I can travel quickly.
Simplest option would be a single, relatively simple object. It might be a rock, stump etc. This is usually quite easy to deal with. Just move a bit and place the object in relation with other stuff in the frame. In the long run, just having a single rock in every image might get rather boring though. Try to look for flowers or something colorful that would create some more variety in the colors you have int he frame. Old boats etc are also one nice option.
Left: A schoolbook example of placing the sun and object in the frame using 1/3 spots. This was also photographed in quite close to center of my old hometown. There's lots of buildings behind me, as well as a road few meters back. But this let me create a nice image by isolating everything else away.
Right: This old boat really creates the image. It would be quite boring without it. Since I wanted to shoot this as vertical photo, it made most sense to place the boat in the middle of the frame, since it takes so large part of the frame.
A bit more complicated thing would be some kind of formation of objects, like several stones. Here you might want to move around them as much as possible. You also need to decide which ones to include into frame and which ones not. Try to see if the formation is heavier on the other side, for example, when placing the sun in relation to it. Also you might want to see if the formation would create anything interesting, like leading lines to use.
This formation of rocks creates interesting "arrow" pointing into horizon, leading your gaze through the image. I also decided to leave few of them outside the frame that didn't fit the image too well. As stated, you can do this either by moving yourself or zooming. Moving changes the perspective while zooming only crops.
A pool of water is usually really nice object with sunset. It might create really nice reflection of the sky. Easiest place to find these would probably be near a lake or sea. One important thing to consider with these is the shape of the pool again, somewhat same as with a formation of several objects. You could also place the pool in the middle of the frame, especially if it fills the lower partition of it in vertical image.
Left: Combination of the pools shape and the leaves on the right side made me to place the pool itself on the left side of the frame.
Right: Since the pool didn't take the whole bottom of the frame, and I had the pier on the left side, I decided to place the pool on the right side of the frame. Notice that I have cropped this in post processing. It's better to get the composition right in the field but you can easily crop the image in post-processing also.
A coast is also really interesting foreground interest, especially if there's enough waves. You need to find some spot that looks nice in image. Then decide what kind of exposure time to use. I talked about this in the "weather" part of this article. You might use a beach here to photograph a wave coming to the beach or you might want to photograph a wave hitting the rocky coastal line.
It's important to keep your eyes open for anything interesting you might see. These are just few examples and most likely you could create the most interesting photos with the help of something really different. But it's at least good to practice with some basic things.
This is the most popular photo in my gallery. Just something I happened to walk past. Light shining through the ice formations really looked interesting. Also notice that I still placed the sun on the left 1/3 spot since the trees were on the right side.
My basic work flow
As the last part I'm going to go through my basic work flow. I'm not talking only about post-processing here, but the work flow from planning the shoot to finished image (in this case ready to be uploaded here). The reason I chose this image was that it is one of my more recent images and I still remember what I did for it. This work flow might not be best for you (or you even might know how I could do it better) but this is just one example.
The whole process starts with planning phase. First I need an interesting place to visit. Since this is sunset photography, it needs to have a nice view into sunset, so I started with finding out the sunset direction. I used Google maps to look for interesting place. When I found one, I also checked few sites with aerial photos that what it actually looks like. When I was satisfied, I made an schedule for me. I also knew that the weather forecast for the day was saying that the sun might be visible. It was not for sure, but I decided to try it anyway.
As next step, I found out when the sun was setting and planned my trip according to that. I arrived to location about few hours before the sunset. I walked around for some time, looking for good spots to take the photo and this was among them. This was relatively tricky spot since the seaweed was quite slippery. I had to be extra careful there not to slip and fall into water with my camera. On the other hand, the seaweed gave interesting green color for the image and I wanted to have it in the frame.
When the time was right, I came back there. First I had my camera on my hand and looked through the viewfinder for good angle. Then I set up the tripod and attached the ND grad filters and remote trigger for to the camera. I measured the light, put on the filter and took one test photo to check the exposure from histogram. I also adjusted the timing a bit (1s exposure, not to make foggy water but still make it look like it's flowing).
I used mirror lock up and remove trigger to shoot this. This prevents all the vibrations that would come from either me touching the camera or the mirror slamming open affecting the image. I locked the mirror up and waited for a good wave and then shot the image.
When I got back home, I uploaded the images to my computer with Adobe Lightroom that I use as catalog. I made the raw conversion and few basic changes with it (like curves, white balance and color vibrancy) and then exported 16bit tiff to Photoshop. With Photoshop, I tweaked the levels and also cloned a small part of a stone away from the bottom part of the frame. I re-sized the image, sharpened it, put the watermark and frames to it and uploaded it.
So here are few more thoughts about sunset photography that I have learned during past 6 months. The learning curve is quite steep in the beginning but now it starts to get slightly slower, so it might take a bit more time before I'll get back with this subject. But I'll try to come up with other topics to write about.
My previous articles:
news.deviantart.com/article/57… A quick self-portrait guide
news.deviantart.com/article/55… Beginners wedding photography guide
news.deviantart.com/article/54… 7 Photos as an Example - How did I make them?
news.deviantart.com/article/53… Do-it-Yourself Photography Studio
news.deviantart.com/article/46… How to analyze and critique a photo
news.deviantart.com/article/43… Photography as a Hobby: How to start improving
news.deviantart.com/article/42… Guide to better sunset photos
news.deviantart.com/article/41… Photography learning resources on internet
Join the community to add your comment. Already a deviant? Log In
A quick self-portrait guide
9 min read
Self-portraits seem to be quite popular but, to be honest, quite many people don't seem to get it that well most of the times. Also it seems that the question "how to shoot good self-portraits" frequently comes up in dA photography forum. So this will also work as a reference so I don't have to type same things time after a time.
This guide will teach you the basics of photographing self-portraits. What to do and what not to do. I won't go too deeply into portrait photography though, so this concentrates more to normal problems people usually have with these. If you're interested in learning more about portrait photography, I will provide you few links that are good for learning that.
If you're impatient, here's a really quick version: plan the shoot like a normal portrait, put the camera on tripod, compose, focus and shoot with self-timer.
Basic principle
There is one basic principle with self-portraits that you should keep in mind: they're portraits. What this means is that people usually ask help with "self-portraits" thinking it's some kind of special area in photography. But it's not. They're portraits so think them as portraits, design them as you would do with portraits.
So lighting, composition and the whole concept of the photo work as it works with normal portraits. When you start planning a self-portrait, don't think it as one. Start as you would start with any portrait you might be shooting.
Things not to do
I will start here with few things people usually do even though they really should not. Remember that now I'm talking about portraits you might upload into art community like dA, not quick snapshots that you want for Myspace etc. Also naturally there's no absolutes in art. If it's part of your artistic vision, you might do it this way.
- Biggest no-no would be holding a compact camera on your hand and shooting yourself from mirror. Don't do it, 'nuff said. Naturally there's photos like this: eduardofrench.deviantart.com/a… Kind of clishe, but still something that might work as a portrait for photographer (though you could try to be creative with the idea too). Be aware of the background you have in photos like that.
- Another almost as bad thing would be holding the camera at your arms length and pointing it towards yourself. There's tons of this kind of "self-portraits" in dA too (some people even have galleries full of them). This is really bad clishe and if you want your portrait to be taken as a serious art photo, don't do this. Also you're shooting quite close from your face so it makes your nose look big (perspective distortion).
- Don't take the photo in bathroom, kichen etc unless it's part of your setup. This is more of an aspect of normal portraiture (minding the background) but people seem to miss it quite often. Pay attention into background. Try to either make it meaningful supporting the concept in your photo or try to make it neutral (and I don't mean white wall here). Using a wide aperture with dSLR is one good way to make the background (as long as it's not near you) blurred.
- Also aspect of normal portrait photography, but don't use the on-camera flash. It will just create a flat, harsh lighting. Absolutely don't ever use it if you're shooting yourself from mirror.
Shooting the self-portrait
Since you won't be using the mirror or shooting while holding the camera, this is usually the most tricky part of shooting a self-portrait.
First, you need a tripod. In some occasions, some other sturdy place works also nicely (like a book shelf or a table etc). But tripod is preferable since you it's more sturdy (you actually attach the camera into it) and you can control it better.
Next, put some object to the place where you would be. Best option would be something that is as tall as you are there. So if you're standing, have something (even a stick would be fine) that is as tall as you are. If you're sitting in chair, put something on chair that would reach the height of your head. And if you're... well, you should get the point. If you have somekind of stick, it's easy to mark your joints, mouth, eye etc locations into it.
Next step would be composing the image. This should be rather easy if the object is your height. If not, you might want to take few test shots before continuing, to get the composition right. Also rather make the composition a bit too wide than narrow. It's easy to crop it with post processing.
And then focus. So for this, you need to have the camera on manual focus and you need to focus on the spot where your head would be. This might be quite tricky though if you're using a fast lens to get a shallow dept-of-field. Basic princible of portraits is that make sure that at least the eye closest to the camera is sharp. So try to have something standing on the place where your eye would be.
Then fix the lighting. Again, with digital, you might want to take few test photos with the correct lighting before you start posing there seriously.
Now that you have everything set up, you can start shooting it. Quite often this might need few attemps before you really succeed, so have patience. Put the camera on self-timer (personally I usually use 20 seconds) and get yourself to right pose. An infra red remote would also be nice, but I still would recommend self-timer there (since you need time to get rid of the remote for the photo). I've done fine without it though.
Few other general thoughs
Just few other general thoughts that came into my mind. Mostly basic portrait stuff, but still worth mentioning.
- Worth of repeating: mind the background. Nothing is (well, almost) as horrible as self-portrait with just normal room stuff on the background, or even worse, the bathroom.
- Plan the lighting carefully. You don't need expensive studio lights for it, check the link below.
- A lens with high max aperture (low f-number, like 50mm f1.8) for dSLR will help you to blur the background to isolate the subject from it.
- Use reflectors outside to control the light.
- If shooting in low light without flash, mind the exposure time to get sharp images.
Few good examples
I don't want to provide you with bad examples since I don't want to start insulting people. But at least here's few good examples. Didn't bother seeking them, so just a few.

This is just excellent self-portrait. Good idea (photographer photographing himself) and just excellent execution. Especially the lighting works really well.
:thumb68376788:
As the title says, a clishe self-portrait. But one thing worth noticing: the background. It is completely white, something often used with normal portraits too. Nothing distracting there.
And few from me too, though not necessary that good.

A self-portrait of photographer doesn't need to be shot through mirror. At least if you have two cameras. A really traditional one, not even trying to be original. So it has a really basic studio lighting setup for a basic portrait.
:thumb93063166:
Meant to be a bit caricatyre-style self-portrait. Again with few studio lights.

Really simple photo, testing low key here too. Camera on tripod, one normal reading light for lighting and a black jacket for background.
Portrait photography resources
If you're planning to shoot any kind of portraits, I would recommend learning the basics. Start with these, for example.
news.deviantart.com/article/53… Article by me, some ideas for a home studio
www.professionalphotography101… Basic portrait lighting setups
www.photoflexlightingschool.co… Lots of different lighting setups
photo.net/learn/portraits/ Photo.net portrait photograpy guide
www.anandtech.com/digitalcamer… Nice basic portraiture guide with good examples
My previous articles:
news.deviantart.com/article/55… Beginners wedding photography guide
news.deviantart.com/article/54… 7 Photos as an Example - How did I make them?
news.deviantart.com/article/53… Do-it-Yourself Photography Studio
news.deviantart.com/article/46… How to analyze and critique a photo
news.deviantart.com/article/43… Photography as a Hobby: How to start improving
news.deviantart.com/article/42… Guide to better sunset photos
news.deviantart.com/article/41… Photography learning resources on internet
This guide will teach you the basics of photographing self-portraits. What to do and what not to do. I won't go too deeply into portrait photography though, so this concentrates more to normal problems people usually have with these. If you're interested in learning more about portrait photography, I will provide you few links that are good for learning that.
If you're impatient, here's a really quick version: plan the shoot like a normal portrait, put the camera on tripod, compose, focus and shoot with self-timer.
Basic principle
There is one basic principle with self-portraits that you should keep in mind: they're portraits. What this means is that people usually ask help with "self-portraits" thinking it's some kind of special area in photography. But it's not. They're portraits so think them as portraits, design them as you would do with portraits.
So lighting, composition and the whole concept of the photo work as it works with normal portraits. When you start planning a self-portrait, don't think it as one. Start as you would start with any portrait you might be shooting.
Things not to do
I will start here with few things people usually do even though they really should not. Remember that now I'm talking about portraits you might upload into art community like dA, not quick snapshots that you want for Myspace etc. Also naturally there's no absolutes in art. If it's part of your artistic vision, you might do it this way.
- Biggest no-no would be holding a compact camera on your hand and shooting yourself from mirror. Don't do it, 'nuff said. Naturally there's photos like this: eduardofrench.deviantart.com/a… Kind of clishe, but still something that might work as a portrait for photographer (though you could try to be creative with the idea too). Be aware of the background you have in photos like that.
- Another almost as bad thing would be holding the camera at your arms length and pointing it towards yourself. There's tons of this kind of "self-portraits" in dA too (some people even have galleries full of them). This is really bad clishe and if you want your portrait to be taken as a serious art photo, don't do this. Also you're shooting quite close from your face so it makes your nose look big (perspective distortion).
- Don't take the photo in bathroom, kichen etc unless it's part of your setup. This is more of an aspect of normal portraiture (minding the background) but people seem to miss it quite often. Pay attention into background. Try to either make it meaningful supporting the concept in your photo or try to make it neutral (and I don't mean white wall here). Using a wide aperture with dSLR is one good way to make the background (as long as it's not near you) blurred.
- Also aspect of normal portrait photography, but don't use the on-camera flash. It will just create a flat, harsh lighting. Absolutely don't ever use it if you're shooting yourself from mirror.
Shooting the self-portrait
Since you won't be using the mirror or shooting while holding the camera, this is usually the most tricky part of shooting a self-portrait.
First, you need a tripod. In some occasions, some other sturdy place works also nicely (like a book shelf or a table etc). But tripod is preferable since you it's more sturdy (you actually attach the camera into it) and you can control it better.
Next, put some object to the place where you would be. Best option would be something that is as tall as you are there. So if you're standing, have something (even a stick would be fine) that is as tall as you are. If you're sitting in chair, put something on chair that would reach the height of your head. And if you're... well, you should get the point. If you have somekind of stick, it's easy to mark your joints, mouth, eye etc locations into it.
Next step would be composing the image. This should be rather easy if the object is your height. If not, you might want to take few test shots before continuing, to get the composition right. Also rather make the composition a bit too wide than narrow. It's easy to crop it with post processing.
And then focus. So for this, you need to have the camera on manual focus and you need to focus on the spot where your head would be. This might be quite tricky though if you're using a fast lens to get a shallow dept-of-field. Basic princible of portraits is that make sure that at least the eye closest to the camera is sharp. So try to have something standing on the place where your eye would be.
Then fix the lighting. Again, with digital, you might want to take few test photos with the correct lighting before you start posing there seriously.
Now that you have everything set up, you can start shooting it. Quite often this might need few attemps before you really succeed, so have patience. Put the camera on self-timer (personally I usually use 20 seconds) and get yourself to right pose. An infra red remote would also be nice, but I still would recommend self-timer there (since you need time to get rid of the remote for the photo). I've done fine without it though.
Few other general thoughs
Just few other general thoughts that came into my mind. Mostly basic portrait stuff, but still worth mentioning.
- Worth of repeating: mind the background. Nothing is (well, almost) as horrible as self-portrait with just normal room stuff on the background, or even worse, the bathroom.
- Plan the lighting carefully. You don't need expensive studio lights for it, check the link below.
- A lens with high max aperture (low f-number, like 50mm f1.8) for dSLR will help you to blur the background to isolate the subject from it.
- Use reflectors outside to control the light.
- If shooting in low light without flash, mind the exposure time to get sharp images.
Few good examples
I don't want to provide you with bad examples since I don't want to start insulting people. But at least here's few good examples. Didn't bother seeking them, so just a few.
This is just excellent self-portrait. Good idea (photographer photographing himself) and just excellent execution. Especially the lighting works really well.
:thumb68376788:
As the title says, a clishe self-portrait. But one thing worth noticing: the background. It is completely white, something often used with normal portraits too. Nothing distracting there.
And few from me too, though not necessary that good.
A self-portrait of photographer doesn't need to be shot through mirror. At least if you have two cameras. A really traditional one, not even trying to be original. So it has a really basic studio lighting setup for a basic portrait.
:thumb93063166:
Meant to be a bit caricatyre-style self-portrait. Again with few studio lights.
Really simple photo, testing low key here too. Camera on tripod, one normal reading light for lighting and a black jacket for background.
Portrait photography resources
If you're planning to shoot any kind of portraits, I would recommend learning the basics. Start with these, for example.
news.deviantart.com/article/53… Article by me, some ideas for a home studio
www.professionalphotography101… Basic portrait lighting setups
www.photoflexlightingschool.co… Lots of different lighting setups
photo.net/learn/portraits/ Photo.net portrait photograpy guide
www.anandtech.com/digitalcamer… Nice basic portraiture guide with good examples
My previous articles:
news.deviantart.com/article/55… Beginners wedding photography guide
news.deviantart.com/article/54… 7 Photos as an Example - How did I make them?
news.deviantart.com/article/53… Do-it-Yourself Photography Studio
news.deviantart.com/article/46… How to analyze and critique a photo
news.deviantart.com/article/43… Photography as a Hobby: How to start improving
news.deviantart.com/article/42… Guide to better sunset photos
news.deviantart.com/article/41… Photography learning resources on internet
Join the community to add your comment. Already a deviant? Log In